

For a long time I thought crispy wings required a deep fryer, which meant crispy wings were something I only had at restaurants or at a friend’s house who owned equipment I considered dangerously specialized. Then I read that the secret to crispy baked wings is baking powder, not oil, and I spent about a week convinced that couldn’t possibly be true. It is true. Baking powder raises the pH of the chicken skin, helps it dry out, and makes it blister and crisp in the oven in a way that comes surprisingly close to fried — without the gallon of oil and the cleanup that comes with it.
I made these for the first time for a playoff game a few years back, a little skeptical, expecting to have to apologize to my guests. Nobody noticed they weren’t fried. My brother-in-law asked if I’d gotten a fryer. I told him it was the oven and he didn’t believe me until I showed him the baking sheet. Since then these have become the thing I make any time a game is on or any time I need something that makes a roomful of people very happy with minimal effort on my part.
The other thing about baked wings is that they’re more forgiving than fried. There’s no hot oil to monitor, no temperature swings, no danger of things going wrong in a very fast and messy way. You season them, you put them in the oven, you make your sauce while they cook. That’s about it.

Crispy Baked Chicken Wings
Ingredients
Wings
- 2 lbs chicken wings, split into flats and drumettes tips removed
- 1 tbsp baking powder not baking soda
- 1 tsp kosher salt
- 1/2 tsp garlic powder
- 1/2 tsp black pepper
Buffalo Sauce
- 4 tbsp unsalted butter
- 1/2 cup Frank’s RedHot or similar hot sauce
- 1 pinch salt
Instructions
Wings
- Pat wings thoroughly dry with paper towels. For best results, place on a wire rack over a baking sheet and refrigerate uncovered for 1 hour or overnight.
- Preheat oven to 425°F. Line a baking sheet with foil and set a wire rack on top.
- Toss dried wings with baking powder, salt, garlic powder, and pepper until evenly coated.
- Arrange wings on the rack in a single layer with space between each piece.
- Bake for 30 minutes, flip each wing, then bake for another 20 to 25 minutes until deep golden brown and crispy.
Buffalo Sauce
- Melt butter in a small saucepan over medium-low heat. Whisk in hot sauce and a pinch of salt. Keep warm.
- Toss hot wings in the sauce right before serving, or serve the sauce on the side for dipping.
Notes
Nutrition
Ingredients
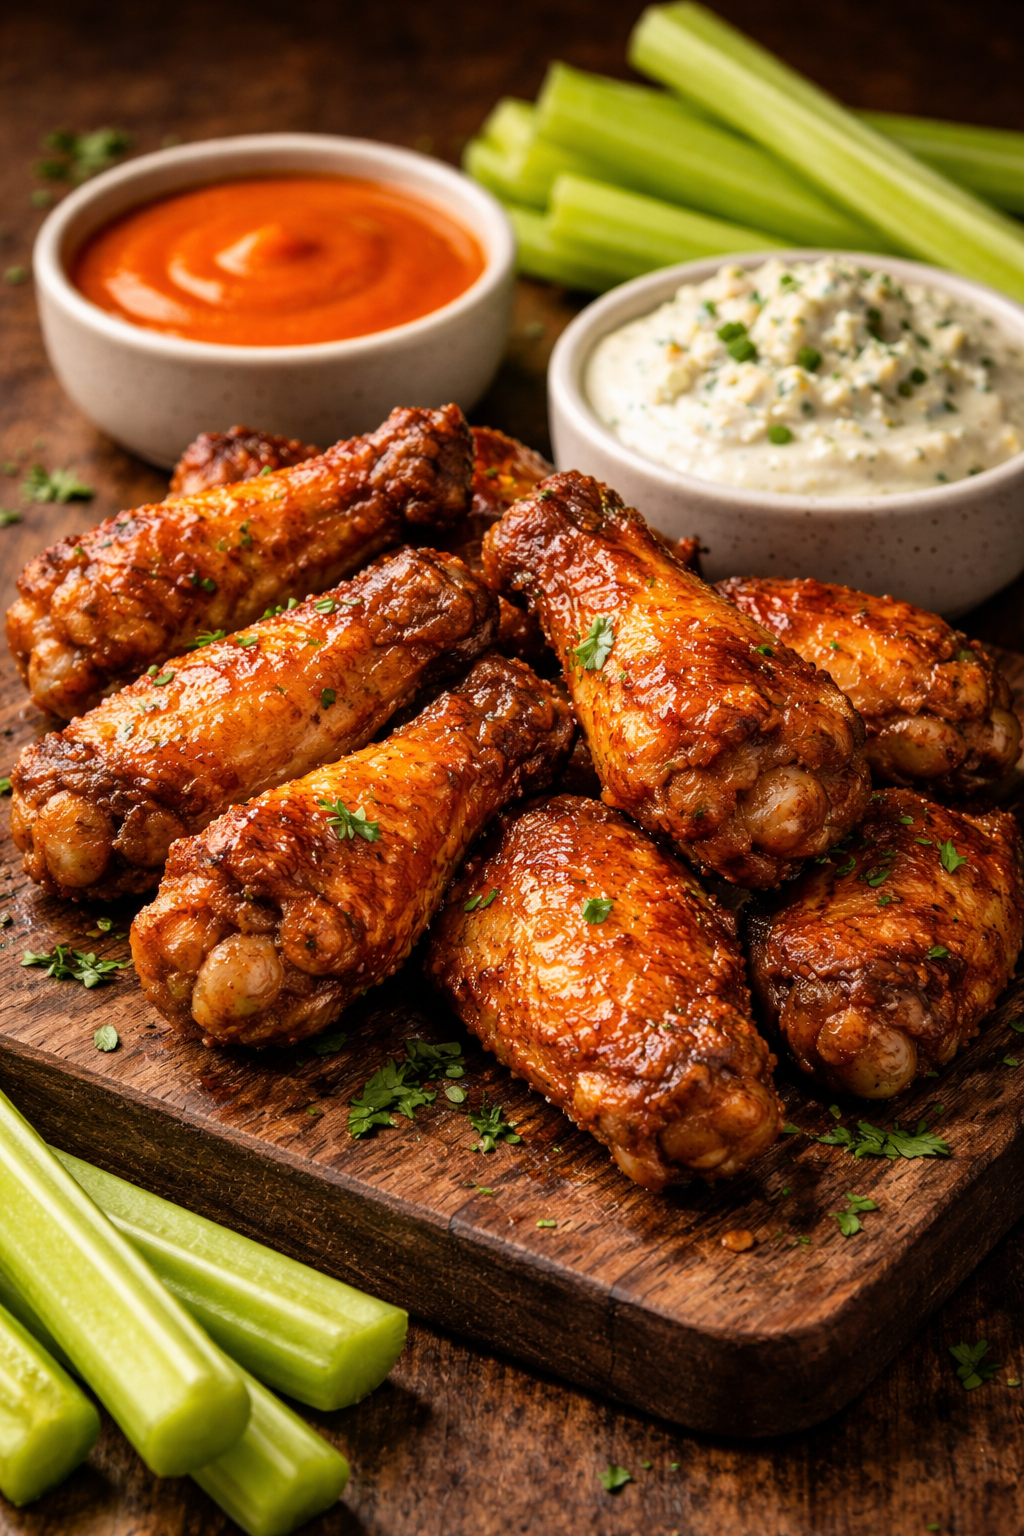
For the wings: 2 pounds of chicken wings (split into flats and drumettes, tips removed), 1 tablespoon of baking powder, 1 teaspoon of kosher salt, half a teaspoon of garlic powder, and half a teaspoon of black pepper. For classic buffalo sauce: 4 tablespoons of unsalted butter, half a cup of Frank’s RedHot (or your preferred hot sauce), and a pinch of salt. Blue cheese or ranch for dipping, celery and carrots on the side.
How to Make It
The step you don’t want to skip: dry the wings. Pat them thoroughly with paper towels until there’s no moisture on the surface. Wet wings steam in the oven instead of crisping. If you have time, put the wings on a wire rack set over a sheet pan and leave them uncovered in the fridge for at least an hour, or overnight. The dry air pulls moisture out of the skin and sets you up for a much crispier result. If you don’t have time for that, just pat them very dry and move on.
Preheat your oven to 425 degrees. Line a baking sheet with foil and set a wire rack on top. The rack is important — it lifts the wings off the pan so air circulates underneath and they don’t steam in their own juices.
Toss the dry wings with the baking powder, salt, garlic powder, and pepper until evenly coated. Arrange them on the rack in a single layer with space between each piece. Bake for 30 minutes, then flip each wing and bake for another 20 to 25 minutes, until the skin is deep golden brown and you can hear it crackling slightly when you move a piece around. While the wings finish, make the sauce: melt the butter in a small saucepan, whisk in the hot sauce, and keep warm. Toss the wings in the sauce right before serving.
Tips
Use baking powder, not baking soda. They are not the same and this is not a place where they’re interchangeable. Too much baking soda gives the chicken a soapy, metallic taste. Baking powder in the right amount just helps the skin crisp without any off flavors.
The wire rack is worth using if you have one. Wings sitting directly on a foil-lined pan will be crispier on top than on bottom, and you’ll end up with a soggy underside. The rack solves this without any extra effort.
Don’t sauce the wings until you’re ready to serve. The sauce softens the skin, and if you’re trying to keep them crispy for a party spread, keep the wings on the rack and the sauce on the side so people can dip. If you’re serving immediately, tossing them in the sauce is fine.
Variations
Honey garlic wings: skip the buffalo sauce and make a glaze with 3 tablespoons of honey, 2 tablespoons of soy sauce, 2 minced garlic cloves, and a teaspoon of rice vinegar. Simmer for two minutes until slightly thickened and toss the wings in it right before serving.
Dry rub wings: skip the sauce entirely and double down on the seasoning. Add smoked paprika, onion powder, and a pinch of cayenne to the coating before baking. Good for people who want something with bold flavor without the mess of a wet sauce.
Lemon pepper wings: bake as directed, then toss in melted butter with a generous amount of lemon pepper seasoning and a squeeze of fresh lemon. Simple and really good, especially in the summer.
Storage and Make-Ahead
Wings keep in the fridge for three to four days. Reheat them in the oven at 375 degrees on a wire rack for 10 to 15 minutes — this brings back most of the crispiness in a way that the microwave absolutely will not. The microwave turns crispy wings into soft, sad wings. Avoid it.
If you want to get ahead, you can do the overnight dry brine in the fridge and leave them uncovered on the rack until you’re ready to cook. They’ll be even crispier for it. The baking powder coating can also be done a few hours ahead — just leave them uncovered in the fridge until it’s time to bake.
Frequently Asked Questions
Why baking powder and not flour or cornstarch?
Flour and cornstarch create a coating that crisps up more like a breading. Baking powder works directly on the chicken skin itself by drawing out moisture and changing its texture during cooking. The result is skin that crisps on its own, which is closer to what you get from frying. Cornstarch can be added in combination with baking powder for extra crunch if you want, but baking powder alone is the key ingredient.
Can I use frozen wings?
Yes, but thaw them completely in the fridge first and pat them very dry before seasoning. Frozen wings hold a lot of water and that moisture has to come out before you get crispy skin. Don’t try to bake them from frozen — the outside will overcook before the inside is safe to eat.
What temperature should chicken wings be cooked to?
165 degrees internal temperature is the USDA safe minimum for all poultry. For wings specifically, most people find the texture is better at 175 to 185 degrees — the connective tissue has more time to break down and the meat pulls cleanly away from the bone. At 165 they’re safe but can feel a little tight.
How do I make them extra crispy?
The overnight uncovered fridge rest makes the biggest difference. Beyond that, make sure the oven is fully preheated before the wings go in, use a wire rack, and don’t crowd the pan. Wings need space around them to roast rather than steam. If you’re making a large batch, use two pans and rotate them halfway through.
Can I make these in an air fryer?
Yes, and they come out great. Season them the same way, cook at 400 degrees for 20 to 25 minutes, shaking the basket halfway through. You may need to do multiple batches depending on the size of your air fryer. Don’t stack them — they need to cook in a single layer to get crispy all the way around.


